R was the 27th computer programming language I learned. When I learned Python, virtual environments did not exist. Pip (the eponymous circular acronym for the “pip installs python” utility) likewise did not exist. So it can be said that I learned R before I learned virtual environments, but not that I learned R before Python. That being said, we are poised to dive into my story of how I developed a custom solution for R virtual environments built upon my experience with 26 different programming languages over a couple dozen years of programming experience.
Requirements
From my current understanding, a virtual environment is akin to a project directory.
This means a collection of:
Various scripts* collected into a single top-level directory (TLD) defining a project
All dependencies required by said scripts and utilities** needed by the project
* The term scripts is used here because we are referring to interpreted language. For compiled language, I will use the term binary.
** The term utilities is used here synonymously with executables to refer to executable scripts or binaries (but not libraries, for example).
The immediate question that comes to mind if you are going to call something into existence worth using is, “what are the different ways one can bootstrap a virtual environment given the above definition?”
To answer this question, I asked another question: “what features do we want/need to support at a high level?”
Basic requirements (Introducing Renv):
Support truly executable scripts that do not have to be invoked as an argument to a wrapper/interpreter
Move scripts without modification to another project directory for testing
Have the project directory live on NFS/DFS so it can be accessed cluster-wide with ease via SGE
Library selection:
Provide seamless migration of project dependencies to be provided locally instead of NFS
Allow virtual environment dependencies to supersede localized CI/CD pipelined dependencies
Interpreter selection:
Be able to use different versions of the desired interpreter (R-3.1.1 versus R-3.3.1 versus R-3.5.2 for example)
Architecture migration:
Make it easy to convert library dependencies compiled on one architecture to another
Enable cross-platform testing
Produce the means to allow heterogenous cluster nodes between architectures allowing smooth/rolling migrations
Pipelining:
Prevent build errors, simple mistakes, and adhoc pathname dependencies in scripts
Does not require devtools to build the virtual environment (support R versions older than 3.0.2)
That is a tall order and I had to think long and hard about how to achieve all this. Supporting R documentation, talking with co-workers, and individual research led me to draw some conclusions about how one should not approach the problem.
From R development standards and well-known practices:
IMPORTANT
Using source() instead of library() creates pathname dependencies in scripts that cannot be managed by manipulating the R session.
A virtual environment modifies where library() pulls libraries from the filesystem (the so-called R session’s library path).
However, requiring an external script to generate the library path means we cannot support truly executable scripts.
At the same time, you would want to avoid the following for the above-stated reasons:
.libPaths(c("library", .libPaths()))
While that will pick up the “library” directory in the current working directory (CWD) when invoked directly, it relies on the script being invoked as “./scriptname.R“. Attempting to run it via full path or another directory, for example when executing via cron, you may not pick up the library directory or worse, pick up the wrong library directory (for whatever value of “wrong” you may wish to define).
This behavior puts the same pathname dependency in your executable script as using source() and should be avoided to properly implement flexible virtual environments (at least, if we want to have a chance at supporting that lofty list of wants/needs above).
The solution that I arrived at was a new R interpreter. One that will:
Automatically bootstrap your virtual environment before invoking your script
Not rely on environment variables
Support interpreter indirection
Be easily overridden by invoking the interpreter directly or using a wrapper
Be invoked interactively for testing in the virtual environment
Supports all of the above previously-stated requirements
Eliminates path dependencies from scripts as required by common R development standards and practices
Then there is the little matter of a name for this new interpreter.
Introducing Renv
If you are familiar with /usr/bin/env as a wrapper for accessing your desired interpreter (be it sh, bash, R, python, awk, perl or other) you should know how to use Renv.
Instead of using an invocation line like below (suggested by standard R development practices and tutorials):
#!/usr/bin/env Rscript
Use the following for a script that wants to utilize virtual environment features:
#!/usr/bin/Renv Rscript
INFORMATION
Not all systems have “Rscript”. A quick way to check for what you can use is to type “Rscript” (without quotes) and then TAB twice to invoke command-line auto-completion to suggest all the possible completions, such as Rscript-3.1.1, Rscript-3.3.1, etc.
CAUTION
This is the foot of the rabbit hole. It’s a lot deeper than you think. Don’t let the simplistic addition of a single character here (changing /usr/bin/env to /usr/bin/Renv) fool you. Things are about to get much deeper from here onward.
This tells Renv to:
Look for a “library” directory in the same directory the script lives in (irrespective of CWD)
Launch Rscript with a modified .libPaths() if the “library” directory exists
But that’s not all.
From the above requirements, we now have:
Support truly executable scripts that do not have to be invoked as an argument to a wrapper/interpreter
The invocation line can bootstrap the execution environment
The invocation line is treated as a comment when script passed as argument to wrapper/interpreter
Move scripts without modification to another project directory for testing
Moving the script to another project directory will have it load the library contents from the new project
Have the project directory live on NFS/DFS so it can be accessed cluster-wide with ease via SGE or other scheduling software
Where the project directory lives (e.g., where the NFS mount is attached) is immaterial
Library Selection
Provide seamless migration of project dependencies to be provided locally instead of NFS
Allow virtual environment dependencies to supersede localized CI/CD pipelined dependencies
A project directory living on NFS/DFS is doomed to sacrifice performance when the I/O pipeline becomes saturated at either the sending or receiving end. One cannot rely on caching to save you from slow access times for executable code because cache elements are commonly evicted to make room for user-land memory pressure. While it makes sense to use NFS to satisfy project dependencies at small scale, at larger scale you end up reloading dependencies in high-memory conditions because you can’t hold a filesystem cache. We call this “living on the wire” and it puts tremendous load on the sync-store (your NAS, SAN, REST, or whatever) backend. We commonly see loads of over 500 (10x higher than desired) for system load averages on the NAS providing access to user home directories.
The problem therein becomes how to package virtual environment contents for distribution to the local disk. However, once you solve that, you still need a way of seamlessly accessing the newly deployed localized binaries.
Renv can check for more than just a “library” directory and it checks in more than one place.
Previously we saw how Renv (without any command-line options) will look for a “library” directory in the same directory as the script. In that scenario, if a script were to examine .libPaths(), one would get something similar to:
Inside the project directory (aka virtual environment)
Inside the R distribution
Base R library
When you say:
library(name)
It will look first in the library.project7 directory in the script’s directory, then in the library.project7 directory that is distributed via the Continuous Integration (CI) and Continuous Deployment (CD) pipeline, and lastly in the base R library collection.
Moving the project library directory (library.project7 in this scenario) aside or using a full pathname to the library directory (example below) will cause only the localized (non-NFS, non-DFS) libraries to be loaded:
However, using a full path precludes you from potentially augmenting or overriding the pipelined binaries, should the need arise. Renv intelligently adjusts .libPaths() based on the existence of multiple “-l dir” option-arguments which can be relative or absolute.
For large projects using virtual environments that want to separate scripts into separate directories, such as “bin“, you can use paths relative to the directory the script lives in without fear that the current working directory will effect the loading of the proper library collections.
#!/usr/bin/Renv -l ../library.project7 Rscript
Inspecting .libPaths() inside a script launched in this scenario (if all the below directories exist) would be:
INFORMATION
Despite the “../” prefix on the relative library reference, Renv knew to add a “library.project7” directory to “.libPaths()” if it existed in the same directory as the base R library.
If you choose to name your library directory “library” then pipelining the executables into RPM will require putting them into the base R library collection – which means stricter guidelines to prevent regressions against scripts running in the global context outside of virtual environments.
Renv orders the directories that it finds specifically to enable the ability to slip RPM-distributed binaries into the search path, but allow forward progression through divergence at the upper layer. By allowing the specified library at the project-level to override everything, a project maintainer can make changes to the library, test code, and then – when it comes time – feed a snapshot of the virtual environment into the RPM pipeline for automated integration and deployment, bringing the RPM layer in-sync with the project layer.
Interpreter Selection
Be able to use different versions of the desired interpreter (R-3.1.1 versus R-3.3.1 versus R-3.5.2 for example)
Just as /usr/bin/env allows you to select the interpreter based on the $PATH environment variable, Renv allows this and more for your R scripts.
A few key features:
You can use R or Rscript (including R-<version> and Rscript-<version>) interchangeably
You can create symbolic links to Renv to make referencing specific versions of R more convenient
When you install any of the R*-fraubsd RPMs, such as R331-fraubsd, a symbolic link is created:
/usr/bin/Renv-3.3.1 -> Renv
When invoked with the name Renv-3.3.1, Renv will default to using R-3.3.1 in the scope of $PATH to interpret your script. This allows you to use as an invocation line:
#!/usr/bin/Renv-3.3.1
or
#!/usr/bin/Renv-3.3.1 -l library.project7
On the command-line, you can invoke Renv interactively.
Renv-3.3.1
Without the aid of the symlink:
Renv R-3.3.1
This method also works with direct references to NFS based R distributions.
Renv /share/bin/R-3.3.1
IMPORTANT
This should be avoided unless there is a specific reason to avoid $PATH expansion.
If changes are required to the way virtual environments are utilized, Renv is a great tool for centralizing that logic as an intermediary between the script and interpreter.
Architecture Migration
Make it easy to convert library dependencies compiled on one architecture to another
Enable cross-platform testing
Produce the means to allow heterogenous cluster nodes between architectures allowing smooth/rolling migrations
Renv cannot help with these items. For that, we must look to the Virtual Comprehensive R (VCR) utility.
Taking an existing library directory that was compiled on one platform (say, CentOS 6) and trying to use it on another (say, CentOS 7) is usually difficult, but vcr aims to make it as painless, fast, and easy as possible.
Given a particular virtual environment library, the following command will record a “playlist”.
vcr list
If there is a “library” dir in the current working directory, this will produce a list of libraries required to build that environment.
If you need to list a different directory:
vcr list path/to/library
You will want to capture the output into a text file. While not strictly necessary, if problems occur, it is good to be able to modify the output with a text editor before trying again (for example, if software has changed location).
vcr list > reqs.txt
IMPORTANT
Use a more descriptive name than “reqs.txt”
You can then play this list on the target architecture (say, CentOS 7).
vcr play -d library.newarch reqs.txt
IMPORTANT
Suggest using something like “el6” or “el7” instead of “newarch”
If your library only contains items from CRAN, it will go smoothly. In such cases, you could even tie the process into a single command:
vcr list | vcr play -d library.new /dev/stdin
IMPORTANT
If your library collection contains libraries that come from GitHub or other non-CRAN source and you did not build the library directory using vcr, you will have to modify the output from “vcr list”. Commands such as “vcr install” which takes a URL to a CRAN-looking package record the URL provided so that a later “vcr list” will accurately describe where the software comes from.
A script that is using Renv to access a “library” directory might have an invocation line of:
#!/usr/bin/Renv-3.3.1
To make this script load the “library.new” directory containing CentOS 7 binaries instead of the “library” directory containing CentOS 6 binaries (for example):
Renv-3.3.1 -l library.new script [args]
This enables efficient cross-platform testing, but is not designed to be the end of the road. Allowing heterogeneous operation wherein your scripts can function properly on both CentOS 6 and 7 requires the ability to access a library that is architecture specific without the need to reference two different directory names.
That is why Renv checks for a named directory in the base R directory. In the absence of a “library.xxx” directory from such an invocation line in a script:
#!/usr/bin/Renv-3.3.1 -l library.xxx
When your script runs it will pick up will either be:
/opt/R/3.3.1/lib64/R/library.xxx
or
/software/R-3.3.1/lib64/R/library.xxx
Depending on what “R-3.3.1” evaluates (be it /usr/bin/R-3.3.1 symlink pointed to /opt/R/3.3.1/bin/R or perhaps instead /software/bin/R-3.3.1 symlinked to /software/R-3.3.1/bin/R)
IMPORTANT
The ability to pass an absolute path for the library location to Renv allows you to ignore a local directory in the virtual environment that may be the incorrect architecture due to NFS wherein, for example, a script may be running on CentOS 7 but the library directory was compiled on CentOS 6.
In this scenario when a script hosted on NFS run on various platforms will pick up the right binaries loaded onto the local disk. This not only solves the issues of targeting platform specific binaries but also improves performance by reducing reliance on NFS.
Pipelining
Prevent build errors, simple mistakes, and adhoc pathname dependencies in scripts
Does not require devtools to build the virtual environment (support R versions older than 3.0.2)
To pipeline a virtual environment so that you get CentOS 6/7 specific binaries in /opt/R/<version>/lib64/R/library.<name> (respectively) is not hard.
Run:
vcr play -d library.preflight project_reqs.txt
Where “project_reqs.txt” is the output of “vcr list” on the library you want pipelined and “library.preflight” is just a temporary directory name that we will later delete after testing.
IMPORTANT
Make sure library.preflight doesn’t already exist at the start of your preflight test.
When you can successfully complete a preflight run of your project requirements, you can proceed to pipelining and automation.
The “project_reqs.txt” file should be stored in git so that Jenkins can automate integration efforts whenever the file is modified. You should also create an automation user (for example, named “rbot“) for all R-related pipelining tasks.
You should check the requirements file into a git repository where a “git tag” operation can version the reqs file against the code that relies on it. For example, if you are pipelining a virtual environment for code that lives in the foobar git repository, the requirements file should live there.
As in all good things, the most important thing may be the naming of your library collection.
Your reqs file, for the purpose of pipelining, should be named:
*_<r-version>.lock
WARNING
The “.lock” suffix is required by the pipeline. The “<r-version>” value should be “3.3.1” for example.
The prefix (what comes before “_<r-version>.lock” does not dictate the name of the library collection in “/opt/R/<r-version>/lib64/R/” nor does it dictate the prefix of RPMs produced by the pipeline.
The naming of the RPMs is governed in one of a couple different ways.
However, before we talk about naming, I need to talk about the pipeline framework.
The “pkgcenter-newR” git repository is a skeleton repo that exists as a template for each individual pipeline. Each virtual environment deployment pipeline should be a copy of this git repository at the onset. https://FrauBSD.org/pkgcenter-newR
IMPORTANT
Don’t fork the repo unless you intend to upstream changes to the framework that affect future deployments from the pkgcenter-newR skeleton repo. Instead, use the below process for copying the framework into a new repo.
First create the new repo. Here is where the naming comes into play discussed earlier.
By default (this behavior can be overridden) the name of the repository minus the “.git” suffix and “pkgcenter-” prefix becomes the name of RPMs produced. That is to say that the git repository named “pkgcenter-newR” will generate RPMs named “newR-*.rpm” that installs R libraries to “/opt/R/<version>/lib64/R/library.newR“.
Let’s say we want to package a virtual environment for a project named “project7” which will have RPMs named project7R* (e.g., project7R311-*.rpm, project7R331-*.rpm, etc.)
IMPORTANT
It is highly recommend that aside from making a new repo with name beginning with “pkgcenter-“, the name should end with “R” because the R version will be appended to the repo name. A git repo named “pkgcenter-project7R” will produce RPMs named “project7R331-*” for R-3.3.1 compiles; “project7R311-*” for R-3.1.1 compiles; etc.
You can override the default behavior of taking the git repository name as the prefix for RPMs. When we copy the framework into t he new git repo, we will configure the build.conf file which has an option for hard-coding the prefix of RPM names.
Steps to copy the pkgcenter-newR build framework into a new git repository named pkgcenter-project7R:
IMPORTANT
Always put a trailing-slash (/) after each pathname (in rsync parlance the trailing-slash should be pronounced “contents-of” to remind you that if you forget it, you may end up with a copy of the src inside the dest argument (and if you are using the --delete flag with rsync, this could be fatal or at least potentially hazardous to your health).
Inside the ./depend/jenkins directory is a file named build.conf which contains all the details for building RPMs in an automated fashion from the output of “vcr list” (which is a pip-like “.lock” file).
For our mythical “project7” secret project, we need to put together some libraries.
Our secret project depends on the following:
bender version 0.1.0
blender (latest version)
catboost (latest version)
The first two are available from CRAN and the last is available from GitHub.
Using the previously discussed techniques for managing a virtual environment library, let’s get ready for a preflight test. Before reaching preflight you need a runway which means installing the software for an initial test.
INFORMATION blender requires vegan which requires permute. The latest version of vegan requires a newer version of R, so we specify the last version that works with R-3.3.1 (just one minor revision older than the latest version). The vcr utility does not automatically solve dependencies for you. You must install dependencies first. Above, you see that we have provided permute and vegan on the same line before blender.
IMPORTANT
While vcr can take any URL, the name of the tarball file should be in CRAN format (<name>_<version>.tar.gz). This is important for pipelining into binaries so that the CI/CD pipeline can determine the version of the package from the filename during the build process.
The filename will not work with the CI/CD pipeline which expects CRAN-like names.
Download the tarball, change the name to be in the format of “<name>_<version>tar.gz” and upload it to Artifactory or similar HTTP-based yum repository.
$ vcr-3.3.1 install bender==0.1.0
==> Download
curl -Lo /home/dteske/vcran/bender_0.1.0.tar.gz https://cran.r-project.org/web/packages/bender/../../../src/contrib/bender_0.1.0.tar.gz
  % Total    % Received % Xferd  Average Speed   Time    Time     Time  Current
                                 Dload  Upload   Total   Spent    Left  Speed
100   992    0   992    0     0    426      0 --:--:--  0:00:02 --:--:--   426
curl -Lo /home/dteske/vcran/bender_0.1.0.tar.gz https://cran.r-project.org/web/packages/bender/../../../src/contrib/Archive/bender/bender_0.1.0.tar.gz
  % Total    % Received % Xferd  Average Speed   Time    Time     Time  Current
                                 Dload  Upload   Total   Spent    Left  Speed
100  3751  100  3751    0     0   4600      0 --:--:-- --:--:-- --:--:--  4596
==> Check dependencies
command R-3.3.1 --slave --no-restore -e 'cat(.libPaths(.Library))'
tar zxfO /home/dteske/vcran/bender_0.1.0.tar.gz bender/DESCRIPTION
All good
==> bender [1/1]
R-3.3.1 --slave --no-restore --args nextArg--no-test-loadnextArg-lnextArglibrarynextArg/home/dteske/vcran/bender_0.1.0.tar.gz
* installing *source* package ‘bender’ ...
** package ‘bender’ successfully unpacked and MD5 sums checked
** R
** preparing package for lazy loading
** help
*** installing help indices
** building package indices
* DONE (bender)
==> SUCCESS
$ vcr-3.3.1 install permute vegan==2.5-4 blender
==> Download
curl -sLo- https://cran.r-project.org/web/packages/permute/index.html
curl -Lo /home/dteske/vcran/permute_0.9-5.tar.gz https://cran.r-project.org/web/packages/permute/../../../src/contrib/permute_0.9-5.tar.gz
  % Total    % Received % Xferd  Average Speed   Time    Time     Time  Current
                                 Dload  Upload   Total   Spent    Left  Speed
100  390k  100  390k    0     0   245k      0  0:00:01  0:00:01 --:--:--  245k
curl -Lo /home/dteske/vcran/vegan_2.5-4.tar.gz https://cran.r-project.org/web/packages/vegan/../../../src/contrib/vegan_2.5-4.tar.gz
  % Total    % Received % Xferd  Average Speed   Time    Time     Time  Current
                                 Dload  Upload   Total   Spent    Left  Speed
100   992    0   992    0     0   1228      0 --:--:-- --:--:-- --:--:--  1227
curl -Lo /home/dteske/vcran/vegan_2.5-4.tar.gz https://cran.r-project.org/web/packages/vegan/../../../src/contrib/Archive/vegan/vegan_2.5-4.tar.gz
  % Total    % Received % Xferd  Average Speed   Time    Time     Time  Current
                                 Dload  Upload   Total   Spent    Left  Speed
100 1989k  100 1989k    0     0  1022k      0  0:00:01  0:00:01 --:--:-- 1022k
curl -sLo- https://cran.r-project.org/web/packages/blender/index.html
curl -Lo /home/dteske/vcran/blender_0.1.2.tar.gz https://cran.r-project.org/web/packages/blender/../../../src/contrib/blender_0.1.2.tar.gz
  % Total    % Received % Xferd  Average Speed   Time    Time     Time  Current
                                 Dload  Upload   Total   Spent    Left  Speed
100 1300k  100 1300k    0     0   700k      0  0:00:01  0:00:01 --:--:--  700k
==> Check dependencies
command R-3.3.1 --slave --no-restore -e 'cat(.libPaths(.Library))'
tar zxfO /home/dteske/vcran/permute_0.9-5.tar.gz permute/DESCRIPTION
tar zxfO /home/dteske/vcran/vegan_2.5-4.tar.gz vegan/DESCRIPTION
tar zxfO /home/dteske/vcran/blender_0.1.2.tar.gz blender/DESCRIPTION
All good
==> permute [1/3]
R-3.3.1 --slave --no-restore --args nextArg--no-test-loadnextArg-lnextArglibrarynextArg/home/dteske/vcran/permute_0.9-5.tar.gz
* installing *source* package ‘permute’ ...
** package ‘permute’ successfully unpacked and MD5 sums checked
** R
** data
** inst
** byte-compile and prepare package for lazy loading
** help
*** installing help indices
** building package indices
** installing vignettes
* DONE (permute)
==> vegan [2/3]
R-3.3.1 --slave --no-restore --args nextArg--no-test-loadnextArg-lnextArglibrarynextArg/home/dteske/vcran/vegan_2.5-4.tar.gz
* installing *source* package ‘vegan’ ...
** package ‘vegan’ successfully unpacked and MD5 sums checked
** libs
gcc -std=gnu99 -I/opt/R/3.3.1/lib64/R/include -DNDEBUG  -I/usr/local/include    -fpic  -g -O2  -c data2hill.c -o data2hill.o
gfortran   -fpic  -g -O2  -c decorana.f -o decorana.o
gcc -std=gnu99 -I/opt/R/3.3.1/lib64/R/include -DNDEBUG  -I/usr/local/include    -fpic  -g -O2  -c getF.c -o getF.o
gcc -std=gnu99 -I/opt/R/3.3.1/lib64/R/include -DNDEBUG  -I/usr/local/include    -fpic  -g -O2  -c goffactor.c -o goffactor.o
gcc -std=gnu99 -I/opt/R/3.3.1/lib64/R/include -DNDEBUG  -I/usr/local/include    -fpic  -g -O2  -c init.c -o init.o
gfortran   -fpic  -g -O2  -c monoMDS.f -o monoMDS.o
gcc -std=gnu99 -I/opt/R/3.3.1/lib64/R/include -DNDEBUG  -I/usr/local/include    -fpic  -g -O2  -c nestedness.c -o nestedness.o
gfortran   -fpic  -g -O2  -c ordering.f -o ordering.o
gcc -std=gnu99 -I/opt/R/3.3.1/lib64/R/include -DNDEBUG  -I/usr/local/include    -fpic  -g -O2  -c pnpoly.c -o pnpoly.o
gcc -std=gnu99 -I/opt/R/3.3.1/lib64/R/include -DNDEBUG  -I/usr/local/include    -fpic  -g -O2  -c stepacross.c -o stepacross.o
gcc -std=gnu99 -I/opt/R/3.3.1/lib64/R/include -DNDEBUG  -I/usr/local/include    -fpic  -g -O2  -c vegdist.c -o vegdist.o
gcc -std=gnu99 -shared -L/opt/R/3.3.1/lib64/R/lib -L/usr/local/lib64 -o vegan.so data2hill.o decorana.o getF.o goffactor.o init.o monoMDS.o nestedness.o ordering.o pnpoly.o stepacross.o vegdist.o -L/opt/R/3.3.1/lib64/R/lib -lRlapack -L/opt/R/3.3.1/lib64/R/lib -lRblas -lgfortran -lm -lquadmath -lgfortran -lm -lquadmath -L/opt/R/3.3.1/lib64/R/lib -lR
installing to /data/homes/raidb/home/dteske/src/github/fraubsd/pkgcenter-project7R/library/vegan/libs
** R
** data
** inst
** preparing package for lazy loading
** help
*** installing help indices
** building package indices
** installing vignettes
* DONE (vegan)
==> blender [3/3]
R-3.3.1 --slave --no-restore --args nextArg--no-test-loadnextArg-lnextArglibrarynextArg/home/dteske/vcran/blender_0.1.2.tar.gz
* installing *source* package ‘blender’ ...
** package ‘blender’ successfully unpacked and MD5 sums checked
** R
** data
** preparing package for lazy loading
** help
*** installing help indices
** building package indices
* DONE (blender)
==> SUCCESS
$ vcr-3.3.1 install https://github.com/catboost/catboost/releases/download/v0.15.2/catboost-R-Linux-0.15.2.tgz
==> Download
curl -Lo /home/dteske/vcran/catboost-R-Linux-0.15.2.tgz https://github.com/catboost/catboost/releases/download/v0.15.2/catboost-R-Linux-0.15.2.tgz
  % Total    % Received % Xferd  Average Speed   Time    Time     Time  Current
                                 Dload  Upload   Total   Spent    Left  Speed
100   617    0   617    0     0   1485      0 --:--:-- --:--:-- --:--:--  1483
100 57.5M  100 57.5M    0     0  5384k      0  0:00:10  0:00:10 --:--:-- 6028k
tar tzf /home/dteske/vcran/catboost-R-Linux-0.15.2.tgz
==> Check dependencies
command R-3.3.1 --slave --no-restore -e 'cat(.libPaths(.Library))'
tar zxfO /home/dteske/vcran/catboost-R-Linux-0.15.2.tgz catboost/DESCRIPTION
All good
==> catboost [1/1]
R-3.3.1 --slave --no-restore --args nextArg--no-test-loadnextArg-lnextArglibrarynextArg/home/dteske/vcran/catboost-R-Linux-0.15.2.tgz
* installing *source* package ‘catboost’ ...
** R
** inst
** preparing package for lazy loading
** help
*** installing help indices
** building package indices
* DONE (catboost)
==> SUCCESS
Upon completion, we should be able to generate the requirements file and then toss the test library.
vcr list | tee project7_3.3.1.lock
rm -Rf library
$ vcr list | tee project7_3.3.1.lock
bender==0.1.0
permute==0.9-5
vegan==2.5-4
blender==0.1.2
-u https://github.com/catboost/catboost/releases/download/v0.15.2/catboost-R-Linux-0.15.2.tgz
$ rm -Rf library
It is recommended you then stash the secret project7_3.3.1.lock file over in ~/src/configs/proj/r_reqs/ (potentially part of a git repo):
Configure depend/jenkins/build.conf with details such as (actual excerpt; all defaults):
#
# RPM name prefix
#
# The default behavior is to take the repo name and remove `pkgcenter-'.
# A value of `R' for example will produce:
#       R311-{vcran,gsl,etc.}
#       R331-{vcran,catboost,etc.}
#       etc.
#
# You can override the prefix and hard-code a value by setting RPMPREFIX.
#
#?RPMPREFIX=R

#
# Location of checked-out config repo
# NB: If unset or NULL, download.sh cannot `git pull' to update the repo
# NB: Ignored/Unused if download.sh is given `-n' to prevent `git pull'
#
CONFIG_REPO=~/src/configs

#
# Git remote settings for cloning config repo (if required)
# NB: If $CONFIG_REPO dir does not exist, download.sh will clone $CONFIG_REMOTE
# NB: If unset or NULL, download.sh will error out unless either `-n' given
#     (to prevent `git pull' in $CONFIG_REPO) or $CONFIG_REPO exists
#
CONFIG_REMOTE=git@github.com:SomeProj/configs.git

#
# Location of lock files within config repo
# NB: Only used in this file
#
R_REQS=proj/r_reqs
Note the potential override to prevent the git repository name from influencing RPM names, should that be desired.
For each target distribution of R, you will need a section like (also in depend/jenkins/build.conf; actual excerpt; all defaults; changed in following steps):
The default build.conf contains a section for R-3.1.1 (shown above) and R-3.3.1.
IMPORTANT
We are only going to automate a single build (for R-3.3.1) in this demo, and the builds are sequentially numbered (BUILD1, BUILD2, etc.), so only the first section should be used and others following should be deleted.
IMPORTANT
You must make “BUILD<n>_NAME” and “BUILD<n>_PATH” end in “_<r-version>.lock” where “<r-version>” matches the R version (for example, “3.3.1” or “3.1.1” or other).
Above is the default state of the file, but for our super secret skunk-works project, “project7”, we will be changing BUILD1_NAME to “project7_3.3.1.lock” for the R-3.3.1 build.
I am not going to actually commit this file to any repo, but I faked it. Placing the file where it should be but not actually committing it, the framework can do everything you expect it to without prematurely polluting the config repo.
Earlier (above), we moved (but did not yet “git add”) the “project7_3.3.1.lock” file to ~/src/configs/proj/r_reqs/. If all goes well we can add/commit/push the file as a sign of reaching the first pipelined version for the virtual environment.
All there is left to do to turn your “.lock” file into RPMs is (in the ./depend/jenkins/ directory of your “pkgcenter-project7R” git repository):
vi ~/.netrc
# Configure credentials for artifactory as-documented in build.conf
./build_fraubsd.sh -a
If your Artifactory credentials are correct, you will be able to then turn around say:
Notice how the URL elements of the “.lock” file were split out into their own RPMs. This is because GitHub projects and CRAN elements are released in separate cycles independently from each other and as-such are pipelined separately to help maintain that relationship.
If for some reason your Artifactory credentials are not working, you can expect to find local copies of the RPMs in your home directory under ~/jenkins/.
Notice how our pipeline only produced rhel6-x86_64 RPMs. To get the rhel7-x86_64 RPMs you have to compile on CentOS 7.
There is a one-time task at the start of each project, which is to tie the vcran package and ancillary external packages together using a meta package. That is covered below. in the next section.
Combining
The above process creates the RPMs but you can optionally, for convenience, combine a “meta-RPM” which installs them for you.
Following the above examples, for our secret “project7” virtual environment that we pipelined into RPMs, we got 2 RPMs:
project7R331-vcran-1.0-1.x86_64.rpm
Contains all the CRAN libraries (bender, permute, vegan, blender)
project7R331-catboost-0.15.1-1.x86_64.rpm
This comes from GitHub and we rename the tarball and put it in Artifactory
We want to create a “project7R331-fraubsd” RPM that installs the above two RPMs.
In the pkgcenter-project7R repository, starting from the TLD of the git repo:
cd redhat/rhel6-x86_64
../create.sh Applications/Engineering/project7R331-fraubsd
cd Applications/Engineering/project7R331-fraubsd
$ cd redhat/rhel6-x86_64
$ ../create.sh Applications/Engineering/project7R331-fraubsd
===> Creating `Applications/Engineering/project7R331-fraubsd'
Package NAME: project7R331-fraubsd
Package GROUP: Applications/Engineering
Creating package repository directory: Applications/Engineering/project7R331-fraubsd
Creating package `src' directory...
Copying `skel' structure into package repository...
./
./Makefile
./pkgcenter.conf
Generating `Applications/Engineering/project7R331-fraubsd/SPECFILE' from `../Mk/template.spec'...
Done.
$ cd !$
$ cd Applications/Engineering/project7R331-fraubsd
Edit the SPECFILE
Change this line (fix “First Last” and “flast@“) toward the top in the “HEADER” section:
Packager: First Last <flast@fraubsd.org>
Still in the “HEADER” section, in the blank space after:
BuildRoot: %{_tmppath}/src
but before the next section (“CONFIGURATION”), add:
IMPORTANT
Don’t forget to add “Requires: R331-fraubsd” (for R-3.3.1). It provides “/opt/R/3.3.1“, all the CRAN libraries at the specific versions required, “/usr/bin/R-3.3.1“, and “/usr/bin/Rscript-3.3.1“. It also brings in Renv for you.
ASIDE: You can use “vcr diff /share/R-3.3.1 /opt/R/3.3.1” to confirm that /opt/R/3.3.1 is a properly localized version of a shared or other version of R at, in example, /share/R-3.3.1/.
Change the line (fix “First Last” and “flast@“) at the bottom after “%changelog“:
* Sun Jul 14 2019 First Last <flast@fraubsd.org> 1.0-1
Save the SPECFILE and exit your editor.
Remove the “src” directory because this is a meta package and we don’t need it.
rmdir src
Make sure the “src” directory stays deleted by editing pkgcenter.conf and adding it to the list of directories which are cleaned when you, or a script, says “make distclean“:
#
# Directories to create before (and clean up after) creating the package.
# NOTE: Be careful to list sub-directories in depth-first order.
#
DIRS="
# Directory
$SRCDIR
"
Do a test compile of our meta RPM before you upload, commit, tag, and push your changes.
You should now have a file named “project7R331-fraubsd-1.0-1.noarch.rpm” in the current working directory. This is usually enough to tell me that I did not make any mistakes and that I can proceed to uploading everything.
mv project7R331-fraubsd-1.0-1.noarch.rpm ~/jenkins/rhel6-x86_64/
make distclean
ls # Pedantic
make autoimport
git push origin master
$ mv project7R331-fraubsd-1.0-1.noarch.rpm ~/jenkins/rhel6-x86_64/
$ make distclean
rm -f .rpmmacros
rm -Rf tmp
Reading SYMLINKS from ./pkgcenter.conf...
Reading DIRS from ./pkgcenter.conf...
rmdir ./src
rm -f .dirs_created
rm -f *.rpm
$ ls
Makefile  SPECFILE  pkgcenter.conf
$ make autoimport
Copying dependencies...
mkdir -p ./src
Reading DEPEND from ./pkgcenter.conf...
make[1]: Entering directory `/home/dteske/src/github/fraubsd/pkgcenter-project7R/redhat/rhel6-x86_64/Applications/Engineering/project7R331-fraubsd'
rm -f .rpmmacros
rm -Rf tmp
Reading SYMLINKS from ./pkgcenter.conf...
Reading DIRS from ./pkgcenter.conf...
rmdir ./src
rm -f .dirs_created
make[1]: Leaving directory `/home/dteske/src/github/fraubsd/pkgcenter-project7R/redhat/rhel6-x86_64/Applications/Engineering/project7R331-fraubsd'
make[1]: Entering directory `/home/dteske/src/github/fraubsd/pkgcenter-project7R/redhat/rhel6-x86_64/Applications/Engineering/project7R331-fraubsd'
rm -f .rpmmacros
rm -Rf tmp
Reading SYMLINKS from ./pkgcenter.conf...
Reading DIRS from ./pkgcenter.conf...
rm -f .dirs_created
rm -f *.rpm
make[1]: Leaving directory `/home/dteske/src/github/fraubsd/pkgcenter-project7R/redhat/rhel6-x86_64/Applications/Engineering/project7R331-fraubsd'
git add -v .
Commit message:
Autoimport by dteske on r-dev.lan

git commit -m "$MESSAGE"
[master 12f10a3] Autoimport by dteske on r-dev.lan
 Committer: Devin Teske <dteske@r-dev.lan>
Your name and email address were configured automatically based
on your username and hostname. Please check that they are accurate.
You can suppress this message by setting them explicitly:

    git config --global user.name "Your Name"
    git config --global user.email you@example.com

After doing this, you may fix the identity used for this commit with:

    git commit --amend --reset-author

3 files changed, 343 insertions(+)
create mode 100644 redhat/rhel6-x86_64/Applications/Engineering/project7R331-fraubsd/Makefile
create mode 100644 redhat/rhel6-x86_64/Applications/Engineering/project7R331-fraubsd/SPECFILE
create mode 100644 redhat/rhel6-x86_64/Applications/Engineering/project7R331-fraubsd/pkgcenter.conf
$ git push origin master
Counting objects: 14, done.
Delta compression using up to 8 threads.
Compressing objects: 100% (8/8), done.
Writing objects: 100% (9/9), 2.15 KiB | 0 bytes/s, done.
Total 9 (delta 3), reused 0 (delta 0)
remote: Resolving deltas: 100% (3/3), completed with 3 local objects.
To git@github.com:FrauBSD/pkgcenter-project7R.git
  1e4f530..563f421  master -> master
IMPORTANT
If you get the warnings about “Your name and email address were configured automatically” it means you haven’t run the “.git-hooks/install.sh” script at the top of the git repo which was copied-in during the rsync of pkgcenter-newR skeleton repo into your new repo.
The project7R331-fraubsd RPM we created does not have versioned “Requires” statements in the SPECFILE so as changes are made to the “.lock” file (“vcr list” output for your virtual environment), “yum upgrade” will continue to upgrade the various components that are already installed. Only if you add a new external (non-CRAN) library (one that uses “-u URL” in the “.lock” file) will result in a requirement to modify the “*-fraubsd” RPM SPECFILE, adding the new dependency.
Conclusion
With our “project7” RPMs installed and providing the directory “/opt/R/3.3.1/lib64/R/library.project7R” we can now use Renv with the “-l library.project7R” command-line argument.
IMPORTANT
Running a script as an argument on the command-line instead of executing it directly will cause the invocation line at the top of it to be ignored. This may be exactly what you desire in some cases and not others. Caveat emptor.
Launching an interactive R session in the virtual environment from the command-line:
Renv-3.3.1 -l library.project7R
$ Renv-3.3.1 -l library.project7R

R version 3.3.1 (2016-06-21) -- "Bug in Your Hair"
Copyright (C) 2016 The R Foundation for Statistical Computing
Platform: x86_64-pc-linux-gnu (64-bit)

R is free software and comes with ABSOLUTELY NO WARRANTY.
You are welcome to redistribute it under certain conditions.
Type 'license()' or 'licence()' for distribution details.

Natural language support but running in an English locale

R is a collaborative project with many contributors.
Type 'contributors()' for more information and
'citation()' on how to cite R or R packages in publications.

Type 'demo()' for some demos, 'help()' for on-line help, or
'help.start()' for an HTML browser interface to help.
Type 'q()' to quit R.

> library(blender)
Loading required package: vegan
Loading required package: permute
Loading required package: lattice
This is vegan 2.5-4
>
or
Renv -l library.project7R R-3.3.1
$ Renv -l library.project7R R-3.3.1

R version 3.3.1 (2016-06-21) -- "Bug in Your Hair"
Copyright (C) 2016 The R Foundation for Statistical Computing
Platform: x86_64-pc-linux-gnu (64-bit)

R is free software and comes with ABSOLUTELY NO WARRANTY.
You are welcome to redistribute it under certain conditions.
Type 'license()' or 'licence()' for distribution details.

Natural language support but running in an English locale

R is a collaborative project with many contributors.
Type 'contributors()' for more information and
'citation()' on how to cite R or R packages in publications.

Type 'demo()' for some demos, 'help()' for on-line help, or
'help.start()' for an HTML browser interface to help.
Type 'q()' to quit R.

> library(blender)
Loading required package: vegan
Loading required package: permute
Loading required package: lattice
This is vegan 2.5-4
>
As discussed in earlier sections, if you wish to then override the “library.project7R” directory that was populated via RPMs and picked up via Renv, you need just create a “library.project7R” directory in same directory as scripts requiring it and Renv will still pick up the RPM based one but allow you to override it locally.
If changes are needed, they can be tested in a local override, merged back to the “library.project7R” directory by-way of the above pipeline.
BONUS: .Renv profile
Renv will automatically source a file named “.Renv” if it exists in the same directory as a script.
The “-p file” argument to Renv can override this behavior to source a specific file instead.
For work (this time around), I have been given a new Macbook Pro 12″ running Mac OS X version 10.14.1, also known as Mojave.
I was missing my ssh-agent notifications on this new mac (see links below), so it’s time to replay my recipe wherein I patch Apple’s OpenSSH to integrate support for Notification Center.
Mac OS X 10.14.1: curl -LO https://ftp.openbsd.org/pub/OpenBSD/LibreSSL/libressl-2.2.7.tar.gz Mac OS X 10.14.3: curl -LO https://ftp.openbsd.org/pub/OpenBSD/LibreSSL/libressl-2.6.5.tar.gz
ssh some-host Note: If you’re just using ~/.ssh/id_rsa and haven’t added the key to your keychain, no notification will appear and you will have to execute “ssh-add -K ~/.ssh/id_rsa” (without quotes; make sure to use capital-K) to add the key to your keychain.
Now every subsequent ssh request that uses a key stored in your keychain will cause a notification to appear in Apple’s built-in Notification Center. Cheers!
I was asked on twitter today to explain some recent work I have done in the multi-factor authentication department. I can write this article because I have recently released my work under the title “secure_thumb.”
While many 2FA and beyond methodologies implement SMS as a factor in authentication, I was uncomfortable sending factors over the wire. Over the years I have had one actual instance where a machine got rooted and the SSH private key (although passphrase protected) was stolen from said machine. At the time, I did not have PGP set up, so I had no way of getting a new key trusted by the FreeBSD community. We quickly blacklisted the stolen key and a review of recent commits was performed to check for any malicious activity. Another developer was sent to my house to verify government-issued ID before a new key was generated offline and injected into the cluster through a trusted channel.
From that incident many years ago, I vowed to never let a single factor stand between me and the FreeBSD cluster again (that factor being a passphrase typed at a command-prompt to load an SSH private key that gave access to the FreeBSD cluster and commit access to change any FreeBSD source code).
Since I was actively writing and maintaining the FreeBSD boot loader at the time, there was some mild concern that malicious code could have been injected into places that few others understood (the loader code that I write/maintain is in a language called Forth; a language which causes most to run the opposite direction and is known for being quite unreadable). I did a top-down review of every line of Forth at that time to put minds at-ease (added benefit, I then shortly after rewrote several of the inefficient structures and solved some inherited issues that were long-in-the-tooth as they say).
Post-incident, my SSH private key to the cluster remained secured on a thumb drive encrypted by GELI — an in-kernel FreeBSD system that allows for the encryption of entire filesystems with a myriad of options. We went from a single-factor to 3-factor in a single day, but we will see how a scare later resulted in the development of 4- and 5-factor authentication that is used today.
For many years I used 3FA implemented as a physical USB thumb drive kept in a secure location, offline, encrypted, holding SSH private keys protected with a unique passphrase. One day, it was believed that I lost this key. When it became obvious that we were not going to find it in any time soon, I had the cluster revoke my keys. This time, however, I had PGP properly set up and could quickly re-establish trust by sending a new public key in a PGP encrypted message to the cluster admin team.
Every time I regenerate my FreeBSD.org private keys (years apart) I take the opportunity to think about security. This time I had an entire framework built around my 3FA solution, and I envisioned a scenario where the person that may have found my thumb drive would not be able to decrypt the contents even if they had stolen the passphrase through keystroke logging. My 4FA solution was born.
Since FreeBSD GELI allows you to have multiple keys (which are essentially concatenated together to form one ginormous key), I built a new framework which creates a key (we’ll call this a trust certificate) for the host or hosts that you want to allow decryption. Thus, only if an attacker were able to purloin both my GELI passphrase using a keystroke logger and steal the GELI keyfile from trusted host will they be able to mount the volume. Those 2 factors plus the physical locality of the thumb drive (and being mostly offline), plus the passphrase required to use the SSH private key, altogether form 4FA.
Where does the fifth factor come into play?
Physically locking USB thumb drives that require a code to unlock before they will yield their plug to a computer. I have seen 3 such mechanical devices (e.g., the Cryptex Round Compass Lock by SDI) and a couple digital ones with a keypad/LCD on the thumb drive.
The secure_thumb framework for managing 4FA using securely-stored and encrypted SSH private keys, see https://FrauBSD.org/secure_thumb
As an added bonus, the framework creates one unencrypted partition to contain trust-management software (*cough* shell scripts that make sure the host is trusted and is not sniffing keystrokes ala DTrace for example) and scripts to automate the mounting of the GELI partition. But wait, there’s more …
The framework creates a FreeBSD slice to allow the creation of multiple encrypted partitions each with a different key and trust certificate. You can make a USB thumb drive that has 7 encrypted partitions, each with a different passphrase, and with the trust certificates for each partition sent to different people. The net effect would be a thumb drive that can be used by 7 people but each person can only open their partition.
There are other hidden features, such as the ability to dynamically resize the encrypted slice (both grow and shrink) but you can also add 2 additional partitions to it for making it look like it’s just a drive for another OS with some random unencrypted data on it for TSA to peruse.
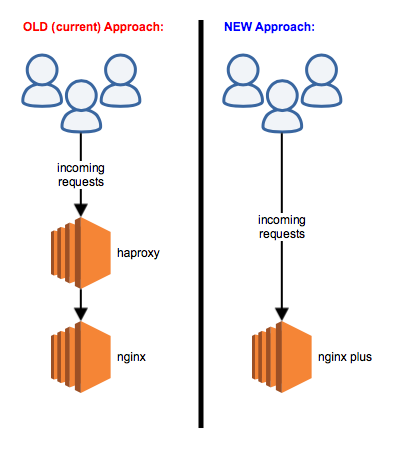
At $work, we have been looking at Nginx Plus because unlike the free open-source version of Nginx, Plus has load-balancing features. We’re pretty excited about that because it means we could potentially replace our reliance on HAProxy. Below is a simple graphic showing the potential infrastructure change.
With an nginx plus license, you can eliminate the need for haproxy
The next thing we had to do was determine which platform we would be using for our test of Nginx Plus. That ended up being limited to just two choices based on our constraints — must be physical hardware and must support HTTP/2 and ALPN.
While the system requirements page doesn’t say this directly, we were informed that the only configuration currently supporting HTTP/2 and ALPN on physical hardware is FreeBSD 11.0 and Ubuntu 16.04 LTS. Others such as CentOS were disqualified because, for example, the OpenSSL version was too old to support ALPN.
With a little bit of work in massaging our PXE server (resulting in a complete rewrite of pxe-config for FreeBSD deployment automation), we had the FreeBSD systems deployed in a matter of days. The generation of a Debian Installer preseed for Ubuntu proved to be far more time-consuming and challenging, but after a week we had the Ubuntu systems deployed as well.
We then registered for a free 30-day trial of Nginx Plus and went through the installation instructions for each Operating System. The steps for FreeBSD and Ubuntu are similar wherein you configure your system to add their package server and use the standard package utilities (pkg on FreeBSD and apt-get on Ubuntu) to install a binary package.
With FreeBSD 11.0-RELEASE-p1 and Ubuntu 16.04 LTS on identical servers in the same rack/switch, we were ready to do some benchmarking to help us determine whether Nginx Plus can deliver equitable performance in a load-balanced array compared with an haproxy cluster sitting in front of the free and open-source version of Nginx.
To generate the right type of load for our performance benchmark, we are using hey by Jaana B. Dogan. Below is the usage statement from hey -h:
Usage: hey [options...] <url>

Options:
  -n  Number of requests to run. Default is 200.
  -c  Number of requests to run concurrently. Total number of requests cannot
      be smaller than the concurrency level. Default is 50.
  -q  Rate limit, in seconds (QPS).
  -o  Output type. If none provided, a summary is printed.
      "csv" is the only supported alternative. Dumps the response
      metrics in comma-separated values format.

  -m  HTTP method, one of GET, POST, PUT, DELETE, HEAD, OPTIONS.
  -H  Custom HTTP header. You can specify as many as needed by repeating the flag.
      For example, -H "Accept: text/html" -H "Content-Type: application/xml" .
  -t  Timeout for each request in seconds. Default is 20, use 0 for infinite.
  -A  HTTP Accept header.
  -d  HTTP request body.
  -D  HTTP request body from file. For example, /home/user/file.txt or ./file.txt.
  -T  Content-type, defaults to "text/html".
  -a  Basic authentication, username:password.
  -x  HTTP Proxy address as host:port.
  -h2 Enable HTTP/2.

  -host	HTTP Host header.

  -disable-compression  Disable compression.
  -disable-keepalive    Disable keep-alive, prevents re-use of TCP
                        connections between different HTTP requests.
  -cpus                 Number of used cpu cores.
                        (default for current machine is 8 cores)
  -more                 Provides information on DNS lookup, dialup, request and
                        response timings.
NOTE: Although our requirements include HTTP/2 and hey has the -h2 flag to enable HTTP/2, our performance benchmarks will be using HTTP/1[.1] because our current edge infrastructure to which we can make comparisons does not yet support HTTP/2.
The command that we used to test the performance of our setup is as follows:
hey -n 3000 -c 300 -m GET -disable-keepalive <url>
This asks hey to perform a total of 3000 HTTP/1[.1] GET requests for <url> with up to 300 concurrent requests.
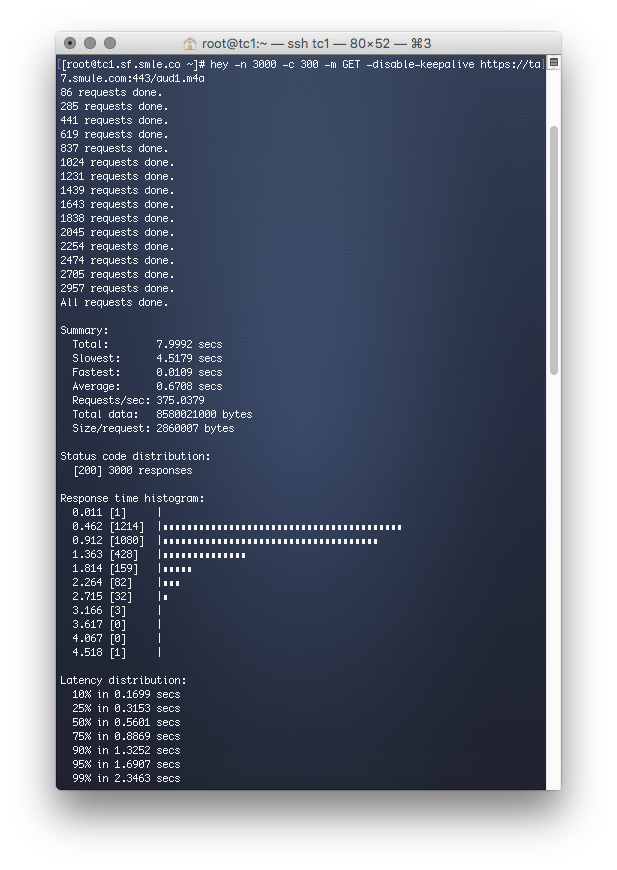
When <url> points to our vanilla Ubuntu 16.04 LTS test box running Nginx Plus, the results are as follows:
The hey command, hammering a vanilla Ubuntu 16.04 LTS server running Nginx Plus
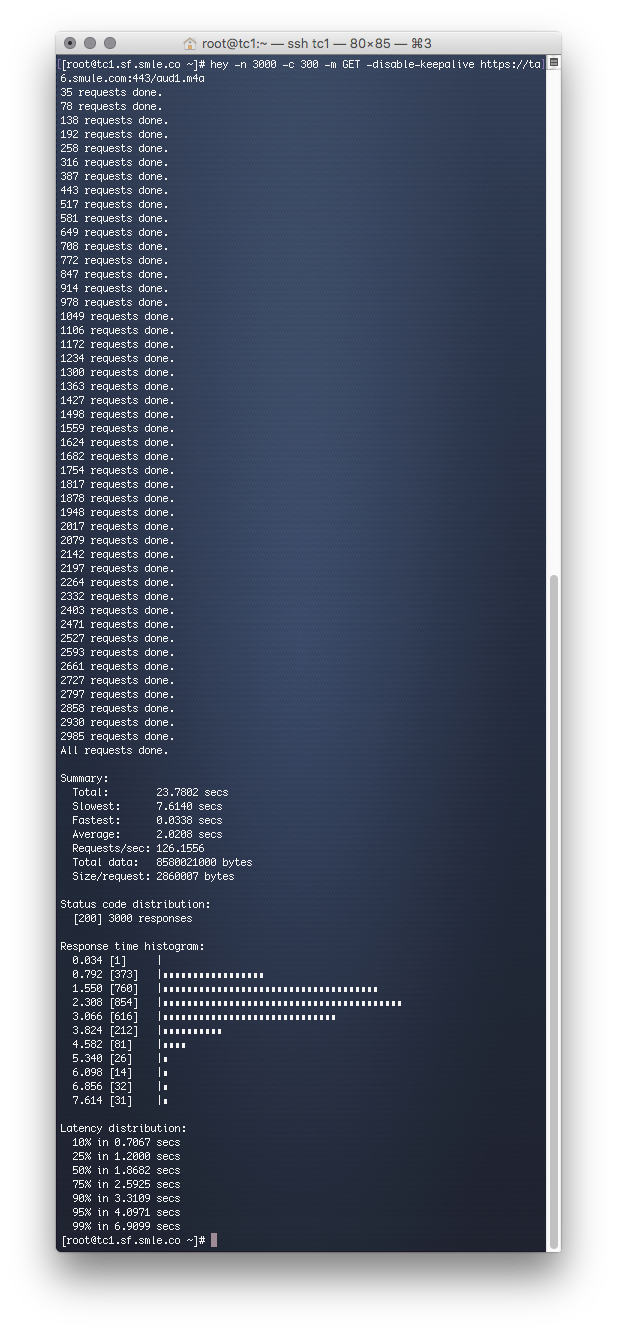
When <url> points instead to our vanilla FreeBSD 11.0-RELEASE-p1 test box, the results are as follows:
The hey command, hammering a vanilla FreeBSD 11.0-RELEASE-p1 server running Nginx Plus
Focusing on the Summary Total, we can see that vanilla FreeBSD takes 3x longer than Ubuntu and something is causing high response times in FreeBSD.
SPOILER: After much digging, it was discovered that the nginx binary for Nginx Plus was linking against an OpenSSL that was compiled from ports without the ASM optimizers (highly optimized Assembly routines for speeding up calculations on supported CPU architectures).
The instructions for installing Nginx Plus on FreeBSD include “pkg install nginx-plus” and this brings in security/openssl from ports instead of using the OpenSSL that comes with the FreeBSD base Operating System. This is generally a good thing because ports are updated more frequently than base which helps keep Nginx Plus up-to-date with the latest OpenSSL.
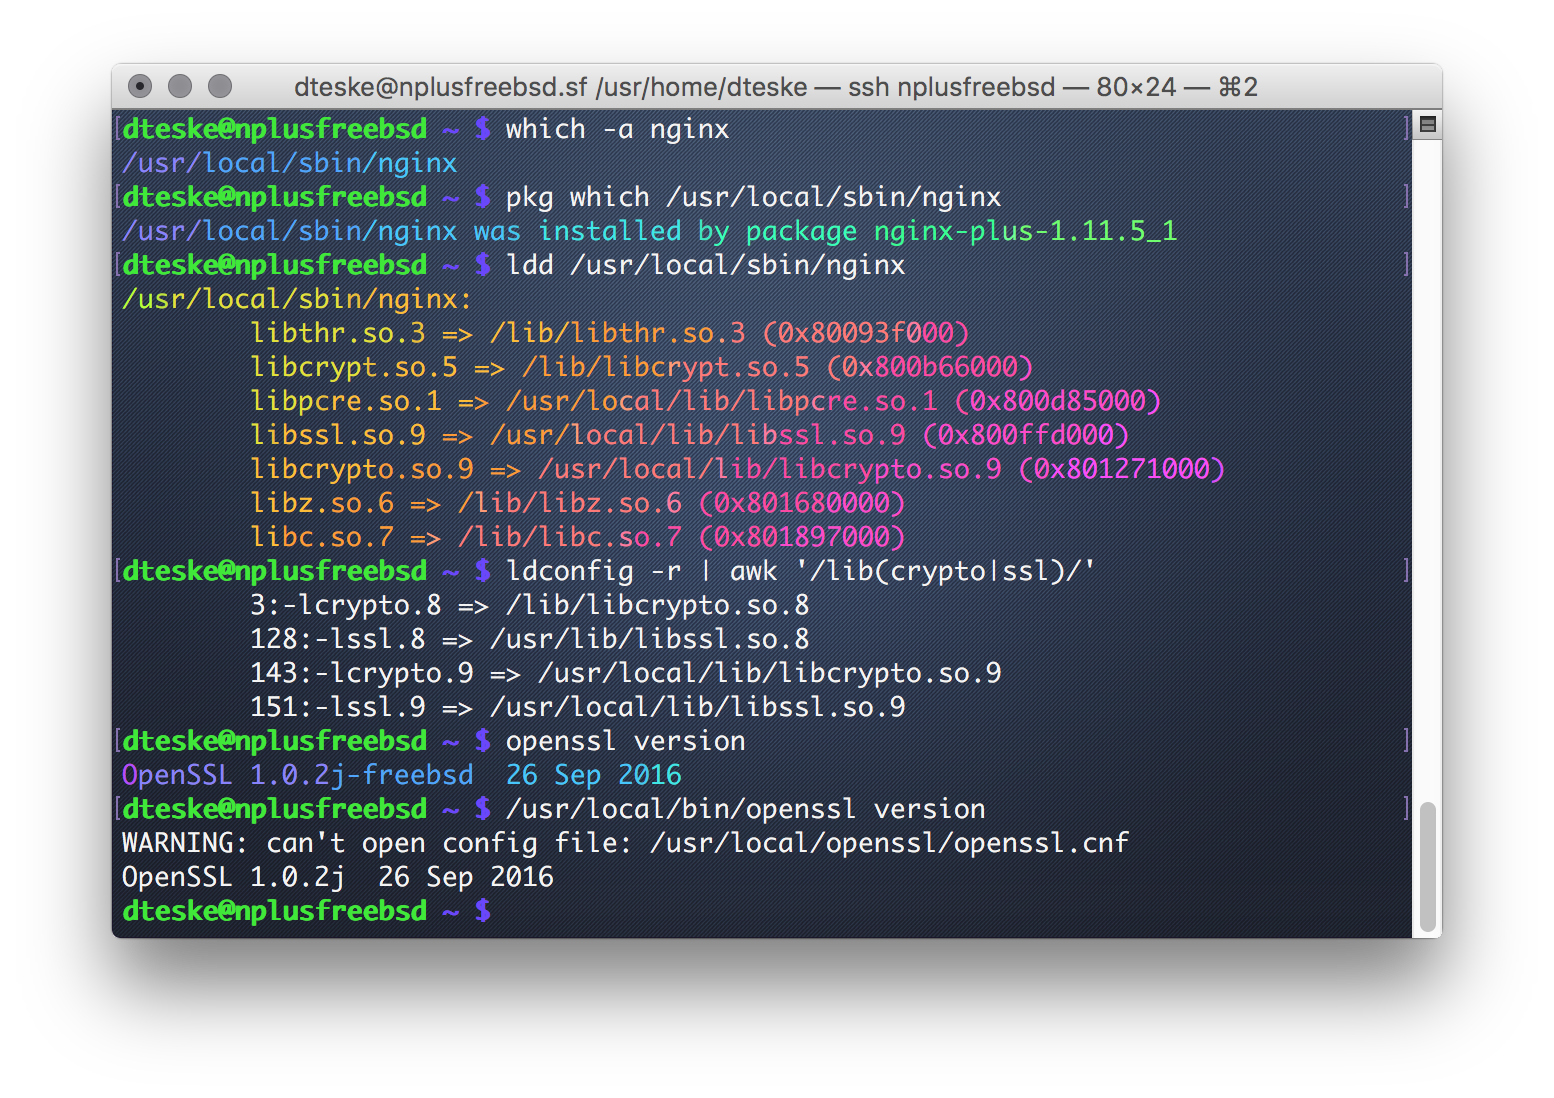
The standard UNIX utility ldd shows us that /usr/local/sbin/nginx (as-installed by the nginx-plus package) links not against the system’s /usr/lib/libssl.so.8 but instead the non-base (read: ports) version located at /usr/local/lib/libssl.so.9
However, as we will see in the below photo, both the system OpenSSL in /usr/bin and the ports OpenSSL in /usr/local/bin are the same version compiled on the same calendar day (despite having different shared library suffixes).
Nginx Plus links to the ports OpenSSL
Though the two versions of OpenSSL appear to be the same, they are actually quite different. When OpenSSL is compiled with ASM optimizations, it can take full advantage of AES-NI and PCLMULQDQ, two important CPU instructions that increase the efficiency of cryptographic calculations.
Testing OpenSSL for AES-NI and PCLMULQDQ to ensure ASM optimizations in support of CPU based crypto
The OPENSSL_ia32cap environment variable is a bit-mask of OpenSSL capabilities which allows us to disable AES-NI and PCLMULQDQ. Combining the values of ~0x200000000000000 (disable AES-NI) and ~0x200000000 (disable PCLMULQDQ) to get ~0x200000200000000, we can disable both AES-NI and PCLMULQDQ for individual runs of “openssl speed“.
In the below two commands, if your CPU supports AES-NI and your OpenSSL has been compiled with ASM optimizations, the first command will be many times faster than the second (wherein optimizations are disabled if available).
As one might expect, the OpenSSL in /usr/bin shows a huge performance increase when AES-NI is not disabled. It was quite the shock to find that the ports OpenSSL in /usr/local/bin showed no differences in performance between the two commands.
We, the FreeBSD committers, took a look at the security/openssl port and discovered that it did not enable ASM optimizations by default at the time the binary packages were last compiled for FreeBSD 11. So I worked with the maintainer of port to fix that for the next time the packages get recompiled.
The next step is to determine the impact that an un-optimized OpenSSL has on our hey tests. The FreeBSD dynamic linker supports configurable dynamic object mapping through libmap.conf(5), so it is a fairly simple matter of telling /usr/local/sbin/nginx to use a different OpenSSL.
Creating /usr/local/etc/libmap.d/nginx.conf with the following contents will cause nginx to use the OpenSSL libraries that came with the base Operating System:
After creating this file and restarting nginx with “service nginx restart“, the hey performance tests now show FreeBSD ahead of Ubuntu in a head-to-head test.
To better illustrate the effects that the unoptimized OpenSSL had on the hey benchmarks, I wrote a utility that generates JSON from the output.
NOTE: While there are many ways to benchmark, this test focused on “time to completion” for 3000 requests with up-to 300 concurrent. The JSON generated depicts the non-linear approach toward completion.
Wrapper script for hey named hey_genlog for generating a log capable of being converted into JSON:
#!/bin/sh
############################################################ IDENT(1)
#
# $Title: Script to generate statistics from hey against a host $
# $Copyright: 2017 Devin Teske. All rights reserved. $
# $Smule$
#
############################################################ INFORMATION
#
# Statistics are logged to stdout. Use hey2graph to generate JSON.
# JSON is designed for highcharts/highstock API.
#
############################################################ CONFIGURATION

#
# hey utility from https://github.com/rakyll/hey
#
HEY=hey

#
# File to request
#
FILE=/aud1.m4a

#
# Total number of requests to perform
#
TOTAL=3000

#
# Maximum number of concurrent requests
#
CONCURRENT=300

#
# QoS rate limiting
# NB: Set to NULL to disable rate limiting
#
#RATE_LIMIT=1 # seconds
RATE_LIMIT= # seconds

#
# Should we use Secure-HTTP (https)?
# NB: Set to NULL to disable https
#
SECURE=1

############################################################ GLOBALS

pgm="${0##*/}" # Program basename

#
# Global exit status
#
SUCCESS=0
FAILURE=1

#
# Command-line arguments
#
HOST=$1

############################################################ FUNCTIONS

usage()
{
	exec >&2
	printf "Usage: %s HOST\n" "$pgm"
	exit $FAILURE
}

############################################################ MAIN

case "$HOST" in
"") usage ;; # NOTREACHED
*:*) : fall through ;;
*)
	if [ "$SECURE" ]; then
		HOST="$HOST:443"
	else
		HOST="$HOST:80"
	fi
esac
echo "Performing $TOTAL total requests"
echo "Maximum $CONCURRENT concurrent requests"
set -x
$HEY \
	-n $TOTAL \
	-c $CONCURRENT \
	${RATE_LIMIT:+-q $RATE_LIMIT} \
	-m GET \
	-disable-keepalive \
	http${SECURE:+s}://$HOST$FILE |
	awk -v cmd="date +%s.%N" '
		BEGIN {
			cmd | getline start
			close(cmd)
		}
		/requests done/ {
			cmd | getline date
			close(cmd)
			date = sprintf("%0.4f", date - start)
			sub(/^/, date " ")
		}
		1
	' # END-QUOTE

################################################################################
# END
################################################################################
The process of generating JSON graph data was performed for Ubuntu, FreeBSD with ports OpenSSL, and FreeBSD with base OpenSSL. As you can see in the below graph, FreeBSD with base OpenSSL is the fastest with Ubuntu very close behind, and FreeBSD with an unoptimized ports OpenSSL coming in at 3x slower.
Satisfied that we had eliminated the performance issue causing FreeBSD to be 3x slower, we now asked why is Ubuntu slower than FreeBSD?
Intensive throughput benchmarks showed that FreeBSD is capable of reaching 87.1% line-rate while Ubuntu was only capable of 86.5%. Both systems given an Intel 10GE network interface, FreeBSD appears to be utilizing the hardware more efficiently. At the switch, we can see that FreeBSD is 99.1% efficient on 10GE, resulting in a measured 10.3% TCP overhead at the time of testing.
FreeBSD line rate test on Intel 10GE, switch-level throughput graph
The result of our testing is that FreeBSD running Nginx Plus is a suitable replacement for our HaProxy and Nginx topology. You and everyone reading this won’t have to worry about the documented issue with OpenSSL because I worked with Bernard Spil and Allan Jude to get it fixed in the FreeBSD ports tree. The security/openssl port has been updated to enable ASM optimizations by default and fairly soon the binary packages will be rebuilt — until then, you can use the above /usr/local/etc/libmap.d/nginx.conf file to temporarily use the base OpenSSL if you’re unable to update /usr/ports/security/openssl/Makefile and recompile it yourself.
For work, I have been given a new Macbook Pro 13″ running Mac OS X version 10.11.6, also known as El Capitan.
I was missing my ssh-agent notifications on this new mac (see links below), so it’s time to replay my recipe wherein I patch Apple’s OpenSSH to integrate support for Notification Center.
sudo cp -avf /usr/bin/ssh-agent{,.orig} Note: This step requires SIP to be disabled
sudo cp ssh-agent /usr/bin/ssh-agent Note: This step requires SIP to be disabled
killall ssh-agent
ssh some-host Note: If you’re just using ~/.ssh/id_rsa and haven’t added the key to your keychain, no notification will appear and you will have to execute “ssh-add -K ~/.ssh/id_rsa” (without quotes; make sure to use capital-K) to add the key to your keychain.
Now every subsequent ssh request that uses a key stored in your keychain will cause a notification to appear in Apple’s built-in Notification Center. Cheers!
As the only release engineer at $work, I have been tasked with creating the bootable USB devices of our FreeBSD-based product to send to the Contract Manufacturer. Every time a new release made it to General Availability (GA) status, Sabine would drop off a couple USB sticks and tell me which build to load onto them.
Wanting to empower her, I set out to create a better approach; one that did not involve dropping to the command-line and tapping-out a “dd” command. Meet a new AppleScript, named “WriteImage” written to take the guess-work out of the process.
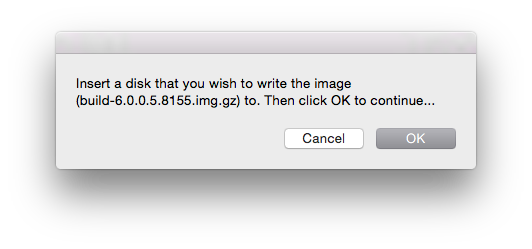
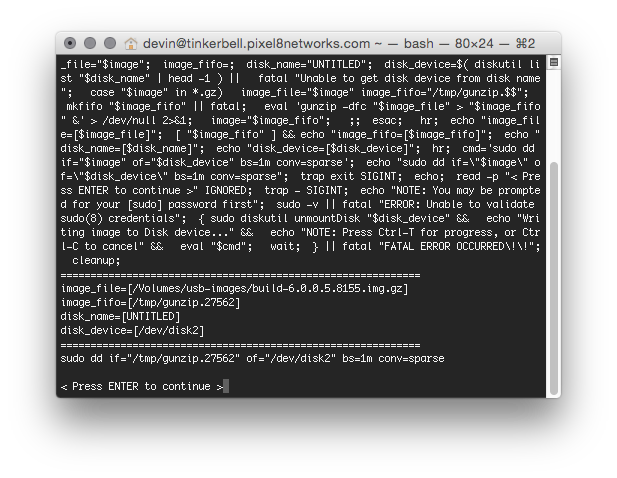
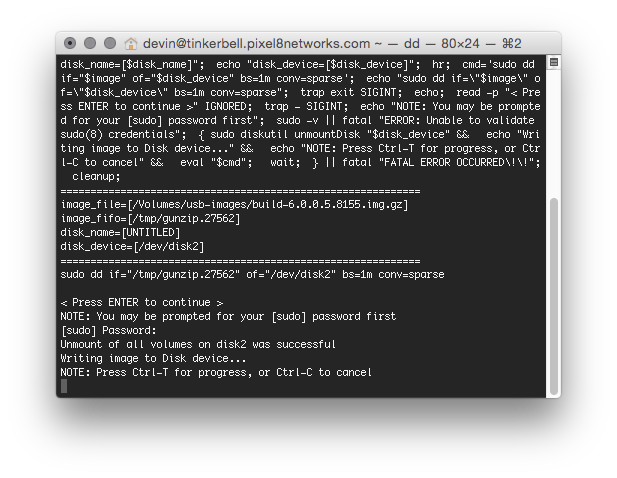
With WriteImage you can now take the USB image file (*.img or *.img.gz) and drop it on the AppleScript droplet. It automates the process of generating the necessary commands to image the file onto hardware USB. Tell the app through a series of clicks or drag/drop actions which image to write, it then prompts you to insert a USB device, and then asks for confirmation (twice) before launching Terminal to do the dirty work.
Let’s see it in action (photo tour):
WriteImage initial dialog when double-clicked.WriteImage prompt, waiting for you to insert a USB device to image.WriteImage displays a Last Chance dialog before proceeding to do anything.WriteImage runs a shell script that does the dirty work.WriteImage ultimately results in an automatically crafted “dd” command run via TerminalWhen “dd” is running, press Ctrl-T on the keyboard to see how much data has been written and how fastAs-is the case with FreeBSD images, when the process is complete, your Mac will give this error. Success in disguise.If you need to image a drive that is not currently readable by Mac OS X, click “Initialize…” and use Erase
Having recently updated my 2014 Macbook Air 11″ from Mac OS X 10.10 to 10.10.4, I lost my customizations to Apple’s OpenSSH and no longer was I receiving anything in the Notification Center for SSH logins using my keychain. Looks like it’s time to rehash the steps necessary to reload support for the Notification Center for those going through the same ordeal.
For reference here’s the original blog post where I introduced the customizations required to get Apple Notification Center support for OpenSSH on Mac OS X:
Step-by-step we’ll go through the motions of re-obtaining the latest copy of Apple’s modified OpenSSH, to be patched.
NOTE: Make sure you’ve updated Xcode in Apple Software Update, else you’ll get the error "configure: error: Your OpenSSL headers do not match your library" during compilation steps below.
ASIDE: You can browse Apple’s opensource repository at https://opensource.apple.com/ (obtaining the latest copy of OpenSSH with Apple’s customizations couldn’t be easier). Rather than documenting how to navigate said page, below steps will instead use direct links to the software we’re recompiling (for brevity).
How to patch Apple’s OpenSSH to support native Mac OS X Notification Center (in 13 easy steps):
Apple Mac OS X makes working with SSH private keys easy and convenient. Things that you can safely forget and drop from your routine when using Mac OS X are:
Apple has integrated launchd(8) and Keychain support into ssh-agent(1) so it launches automatically on-demand and can interact with keys stored in Keychain Access.
First, a brief look at the above integration before we go improving things using new features introduced in Mac OS X 10.8 and higher.
EDIT: If you’re reading this thinking “Mac OS X has had Keychain and launchd integration for a while,” skip on ahead to “That being said…” below).
Traditionally when using an agent you would first manually launch an instance of ssh-agent(1) and then follow that up with:
ssh-add ~/.ssh/id_dsa
while on Mac OS X there is:
ssh-add -K ~/.ssh/id_dsa
which both loads your key into the running ssh-agent(1)and imports it into your Keychain. So you’ll find that quite untraditionally if you kill the running agent and then try to ssh(1) to a remote host, a new agent is launched on-demand and it loads the private key through the Keychain (login succeeds despite conventional logic about agents).
In the following picture, we can see previously loaded key(s) if we filter on the word “ssh” in Apple’s Keychain Access application (provided in the Utilities folder accessible via Command-Shift-U keyboard shortcut while in the Finder application):
View SSH private keys loaded with “ssh-add -K” in Keychain Access
If you delete this key from Keychain Access application then ssh(1) logins requiring that key no longer succeed as the running agent immediately loses access to said key. So the Keychain can be thought of as a persistent store for the agent; one that is tied to your Mac’s login account.
The automatic re-launching of ssh-agent(1) through launchd(8) means that if you kill the running agent it will be re-launched not immediately but only when access is attempted to a launchd(8)-provided default $SSH_AUTH_SOCK value as-configured in /System/Library/LaunchAgents/org.openbsd.ssh-agent.plist.
Initially when Mac OS X boots, ssh-agent(1) is not started. It is only when you perform your first ssh(1) (or related) command that launchd(8) invokes the following command:
/usr/bin/ssh-agent -l
You can see launchd(8)‘s integration in-action by opening a Terminal immediately after booting your Mac and first executing:
ps axwww | grep ssh-agent
You’ll see there are no instances of ssh-agent(1), yet. Meanwhile, if you execute:
echo $SSH_AUTH_SOCK
You’ll see launchd(8) provided a default value (similar to the following):
/tmp/launch-oLGVUi/Listeners
When any ssh(1) command attempts to access this launchd(8) provided $SSH_AUTH_SOCKlistener, launchd(8) invokes the previously mentioned “ssh-agent -l” instance which then accesses private keys stored in your keychain. For example, assuming Remote Login is enabled in the Sharing section of System Preferences (which enables sshd), execute:
ssh localhost
After which, re-execute:
ps axwww | grep ssh-agent
To find a running instance of “/usr/bin/ssh-agent -l” (the “-l” indicating it was launched on-demand by launchd(8)).
This is all very slick integration that quintessentially eases your SSH life. In a nut-shell, it’s private keys provided from your Keychain on-the-fly whenever you use an ssh utility.
That being said, we can certainly improve upon this integration by adding new code to Apple’s version of OpenSSH. Primarily, since ssh-agent(1) can now be loaded on-demand and access data in my Keychain, I would like to get a notification every time someone uses the running agent (for security reasons and also coolness factor).
In Mac OS X Mountain Lion (10.8) and Mavericks (10.9) we are blessed with the new Notification Center API (http://support.apple.com/kb/ht5362). This built-in functionality replaces the need for 3rd-party software such as Growl (http://growl.info) required to perform notifications in previous releases of Mac OS X (10.7 and older).
I first tested integration of the NSNotificationCenter API on a non-Apple version of OpenSSH after failing to get my friend’s Growl-based notification patches to work (I didn’t want to pay $3.99 for Growl in the Mac App Store). Prior to Mac OS X 10.8, my friend @kang had produced the following work for getting notifications out of ssh-agent(1):
However, my good friend’s work was on the non-Apple version of OpenSSH and thus my resulting agent binary lacked launchd(8) integration and Keychain support. This meant that if I were to replace the existing /usr/bin/ssh-agent binary in Mavericks with the patched non-Apple version, I would lose those features previously discussed above, let alone that his patches were for an external notification system versus the new built-in Notification Center.
So I set out to build a drop-in replacement for Mavericks’ /usr/bin/ssh-agent carrying all the integration of the original.
EDIT: Keep reading toward the end for GitHub source link and link to Mavericks binary.
After unpacking Apple’s OpenSSH-186.tar.gz (link above) and applying my patches to add support for NSNotificationCenter, I quickly learned that some additional non-standard configure arguments were required.
Within the top-level openssh directory (of the unpacked OpenSSH-186.tar.gz archive) I executed the following to produce a binary truly worthy of replacing the stock /usr/bin/ssh-agent:
./configure --with-pam --with-audit=bsm

make
After which I had a patched ssh-agent binary in the current working directory, suitable for doing the following:
The very next ssh(1) command I execute causes a new fresh instance of my patched ssh-agent(1) to be invoked. The first time my patched agent attempts to access my Keychain, I get the following audit request (image below):
Granting patched ssh-agent(1) access to Keychain for the first time.
I choose the “Always Allow” option, knowing that if I want to change it later I can locate the private key in Keychain Access (HINT: Filter on “ssh”) and press the Command-I keyboard shortcut to edit Access Controls for that key.
My patched agent is programmed to hook into the new Notification Center and send you a notification when signing requests (image below).
Notification Center message from ssh-agent(1)
Now every time I authenticate by way of private key, regardless of whether that key was loaded once with “ssh-add” or from the Keychain imported via “ssh-add -K“, I get a message from the Notification Center.
EDIT: The primary concern that inspired this work is when you enable agent forwarding to remote hosts. Logging into a compromised host with agent forwarding, a hacker can use your agent to log into yet uncompromised systems to which you have access via your agent. While notifications won’t prevent the use of your agent to reach new machines should you enable forwarding through a compromised system, the notifications will let you know when to (a) shut down your agent (b) take inventory of active connections where agent forwarding was enabled and (c) cull the logs for machines you were forwarding through in an effort to find suspicious activity indicating either a malicious hacker or black-hat administrator on the system. For a corporate laptop that primarily only ever connects to corporate networks (where such activity is never to be expected), a notification is more than adequate to quell the problem (versus a public network where it may be more advantageous to use an ask-pass utility to confirm key usage rather than notify after open usage).
How those messages appear are configured in the System Preferences for Notifications (easily accessible via the gear icon at bottom-right of the Notification Center Drawer). Only after you’ve received your initial message from the patched ssh-agent(1) can you then configure the specifics of how its messages appear. The patched agent pretends to be Keychain Access when talking to the Notification Center, so configuring the style and attributes for Keychain Access notifications will allow you to customize how these agent notifications appear.
As notifications are delivered, they stack up in the pull-out drawer of the Notification Center. I like to clear the log of ssh-agent(1) notifications before I go to bed and check for any when I wake up (perhaps indicating that my agent signed a login request when I wasn’t looking).
By default, I’ve made the agent play the “Submarine” sound during notifications. This can be changed by making your own build from the source code I’ve branched into Git offered below:
But you don’t have to modify the code if all you want to do is disable the notification sound. Within the Notifications section of System Preferences you can state that you don’t want the Keychain Access notifications to play a sound.
Last, but not least, I have made a precompiled binary with my modifications so you can simply download and copy into place (using the below command-line instructions):
Executing these 5 commands and then logging into a remote machine with ssh(1) using private keys should generate a notification from Keychain Access (pictured above). Cheers!
If you need to rollback to the original ssh-agent for any reason, the above steps made a backup that can be restored typing the following commands:
I recently found my FreeNAS box rebooting itself in the middle of the night (every night) and I wanted to know what was going on. I first tried enabling the debug kernel (see below picture) but that didn’t work nor did it get me any closer to understanding the issue at-hand.
Enabling the FreeNAS Debug Kernel from the WebUI
The idea behind enabling the debug kernel was that it would drop me into the kernel debugger rather than rebooting 15 seconds after an unattended fatal error (leaving zero logs to analyze). But much to my surprise, the system rebooted anyway.
The next step was to set up remote syslog to allow FreeNAS to log to an external box. The first thing I did was connect my FreeNAS server directly to a FreeBSD system. The FreeNAS system will be configured to log everything to the FreeBSD system; so when FreeNAS reboots I will have a log of what lead up to that event.
I configured the secondary network interface on each server to talk on the same subnet. On the FreeNAS side, I went into the WebUI and configured the second interface of em1 to have IPv4 address 192.168.1.2 with a /24 subnet (255.255.255.0). When that was done, it looked like the below picture.
Configuring a local second network interface in the FreeNAS WebUI
After that, I logged into my FreeBSD server and prepared it to receive remote syslog data.
Now SSH into your FreeNAS box and execute the following:
mount -uw /

echo 192.168.1.1 freebsd >> /conf/base/etc/hosts

echo 192.168.1.1 freebsd >> /etc/hosts

mount -ur /
Then perform the last final bit, which is to go into the FreeNAS WebUI and enter a value of “freebsd” for the syslog server (see below picture).
Where to configure a remote syslog server fro within the FreeNAS WebUI
At this point, you should be able to execute via SSH on the FreeNAS system:
logger foo
And get the following entry in /var/log/freenas.log on your FreeBSD system:
Jan 26 04:42:37 freenas root: foo
Cheers!
Of course, the jury is still out on exactly why my system is crashing, but I suspect a failing hard disk (the logs being streamed to the FreeBSD system seam to indicate via smartd messages a prefail condition for the boot disk).